
Background
Back in March 2013, I was starting to spend more time traveling to remote places for photography adventures. I realized it would probably be smart to start collecting timelapse sequences along the way, given the effort and travel expense I was putting in, just in case I wanted to learn to put together films in the future. In the beginning, I had no idea how I was going to process and assemble these clips. I really just knew that I could connect an intervalometer to one camera and let it run while I used my second camera to take still shots. By March 2015, I had collected enough material and learned enough about timelapse processing that I could release my first timelapse film, the Watchers. Below I’ll walk through the editing workflow that I eventually arrived at and used on the film.
First, some thoughts on gear and shooting
I generally always shoot raw. This will take up more storage, but gives you more flexibility in processing. You may want to shoot JPEG if you have storage constraints, or if the frequency of shots required is less than your camera can save raw files. (I generally cannot shoot more quickly than 3-4 second intervals with raw). If shooting JPEG, take extra care to get your exposure correct and white balance set properly.
When starting out, I recommend an inexpensive intervalometer. (I use ones by Aputure for use with my Canon 6D bodies.) If you get into more complex day-to-night or night-to-day scenes, or are using a motion control system, you may need something more intelligent. But you can do a lot with a cheap intervalometer. Some newer cameras have this built in now as well.
Once you get into processing, save yourself some headache and get one or two high performance drives for editing. When editing video, you often want to have your operating system on one drive (usually your main internal drive), your application cache on another drive, and your files on a third. In my case, I only have one high performance external drive, where I keep my cache and files. Initially I started on one internal drive, and also experimented with cheap external USB drives, which was painfully slow. Eventually I settled on an external 3TB Thunderbolt G-Drive. You can also try the free utility Blackmagic Disk Speed Test (for mac) to see how your existing drives perform.
My Workflow, v1
The tools I used for processing include Lightroom, LRTimelapse, sometimes Photoshop, After Effects, and Premiere. Aside from LRTimelapse, these tools are part of the Adobe Creative Cloud.
The general order of events is:
- Import raw files into Lightroom
- Process raw files with LRTimelapse and Lightroom
- Export JPEG Files
- Optionally import raw files into Photoshop for additional processing using actions and batch processing, exporting to JPEG files
- Or, export directly from Lightroom to JPEG files
- Assemble JPEG files into full resolution / lossless clips in After Effects
- Assemble clips into a film with Premiere
Let’s take a closer look at each of these steps.
Importing into Lightroom
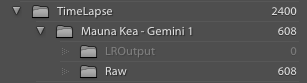
Before importing into Lightroom, you probably want to think about how to organize these files. You may even want to use a dedicated lightroom catalog for timelapse sequences. Currently, I use a single catalog, but I organize timelapse files separately. Typically, on a drive I’ll have a parent level “TimeLapse” folder, then have a folder for each sequence. Inside each sequence folder I’ll create (from within Lightroom), Raw and LROutput folders. The contents of LROutput aren’t tracked by Lightroom, but I find that it’s handy to see that they are there. If I’m going to process through photoshop before saving to JPEG, I’ll often name that folder “PSOutput” so I can easily see that that’s how it was processed.
When importing raw files, I just put all the files into the Raw folder rather than organize by date within that folder.
Raw Processing
Once the raw files are imported, I’ll move over to LRTimelapse and start the back and forth between LRTimelapse and Lightroom to work through raw processing and the animation of changes over time. (If you don’t need any animation of changes over time, you can skip LRTimelapse and just edit one file, then sync it to all the others.) I won’t get into details of this process here, instead I recommend you spend time with the LRTimelapse tutorials. They are lengthy, and you’ll have to watch them more than once most likely. But they do contain pretty much all you need to know.
If you’re not familiar with raw files, it’s important to know a little about how they work. They aren’t edited directly, and by default, Lightroom stores your sequence of edits directly in its catalog file. But you can also “save metadata to disk”, which will write your changes out to a “sidecar” file. For example, if your raw file is IMG_0157.CR2 (Canon raw filename), your sidecar file will be IMG_0157.XMP. Likewise, Lightroom can “read metadata from disk” to read in external changes to a raw file’s “sidecar” file. This is key to how LRTimelapse interacts with Lightroom. It writes its changes to the XMP files, and Lightroom reads them back in. It’s a bit laborious, but it works.
Exporting to JPEG
I prefer to export to JPEG from Lightroom (or Photoshop) in full resolution rather than cropping to to 16:9 aspect ratio. The advantage of not cropping is that it gives you some flexibility to pan/tilt in post (which can be good if you didn’t shoot with any motion equipment). The disadvantages are that you have more pixels to store, and you have some positioning work to do in After Effects.
It’s worth noting that you don’t have to export to JPEG. You can import your raw files directly into After Effects (or even Premiere). The main advantage to this is that the quality is likely slightly better (in my tests, though, I haven’t been able to tell any difference). The downside is that the raw files still need to be converted for the final clip, and the question becomes when you want that work to be done. Exporting from Lightroom to JPEG takes a good amount of time (usually several seconds per file). However, if you create a clip in After Effects from JPEG files, the export is fairly quick (depending on how much processing you do in AE). If you are exporting a clip from raw files, then you have to wait much longer on the export of the clip. If you only process through AE once, then this doesn’t matter. In my experience, though, I often need to reprocess tilt/pan/zoom or even speed once I see how it fits in the final film, so working with JPEG files in AE becomes a time saver.
These choices are generally driven by the quality of your hardware. In my case, I’m working on a two year old Macbook Pro. If you have better hardware, you may be able to just stay in Raw.
Optionally processing in Photoshop
If you need some of the advanced tools in Photoshop to run across all of your images in a sequence, you probably want to create an action, and then batch process that across your images. I’ve done this for things like advanced masking, or applying filters not available in Lightroom. I did this a fair amount in the beginning, but over time I found it to to not really be necessary. Some of my favorite tools like Nik’s Color Efex Pro don’t work well across a sequence because what looks great on one frame ends up looking noisy across a sequence. Adjustment layers, on the other hand, do tend to look good. Your mileage may vary, but I’ve largely found the benefit not worth the extra time.
Assembling clips in After Effects
Once your JPEG files are exported, you’ll want to import them into After Effects. This is where I’ll target the highest final resolution, usually either 4K or HD. (You can export to lower resolutions from Premiere at the end). In After Effects, I’ll largely be working with zoom/pan/tilt kinds of things to best represent the scene. Additionally, if there is any remaining flicker or camera shake, I’ll address that here with GBDeflicker and Warp Stabilizer VFX (AE plugin), respectively. If I’m working with a video clip rather than stills that have been processed, I may also add some polish with contrast/saturation, white point, white balance, or even sharpening. When this is all done, I’ll export these clips in a lossless format for use with Premiere.
Assembling your film in Premiere
The last step is to assemble your clips into a film in Premiere Pro. This is generally pretty easy, and if your clips are well prepared using the steps above, your focus is just on sequencing, transitions, music or other audio, title cards, and the like. Premiere is the tool you’ll use to export to the appropriate format for distribution. It’s worth looking up the recommendations for exporting for your destination platform. For example, Vimeo has specific recommendations on what settings to use when exporting from Premiere and other editors.

Resources
You can find more information on using the Adobe tools on lynda.com, and Adobe’s site. Michael Shainblum’s site has some tutorials on certain techniques, and he even talks briefly about his workflow in his behind the scenes video for “Into the Atmosphere” (a great film worth checking out). Lastly, the timescapes forum has tons of information on all aspects of timelapse photography, including post processing. If you haven’t see the film TimeScapes by Tom Lowe, I highly recommend it!
Conclusion
Since this was my first attempt at this process, it took me a fair amount of time and effort to get to this workflow. The key things for me in this process was understanding raw files and how the sidecar files are used, how to organize raw and JPEG files, and finally the order of events described above. I owe thanks to Sean Goebel, who was kind enough to share his notes with me on how he processes his timelapse films, and they were incredibly helpful. (His films are great, check them out!)
I hope you’ve found this useful. Please share any comments or other approaches you find useful in the comments below!